Process
Final presentation: https://new.express.adobe.com/published/urn:aaid:sc:VA6C2:803c166a-d7bb-4b66-ab09-f7fc0ca5484a?promoid=Y69SGM5H&mv=other
Original concept: 2 pieces, one holds water/drainage, then a decorative tray, sea ocean theme, with different sea textures and images
Started with making simple box shapes
boolean union difficulties
I fixed by dupe the edge and extruding it so it meets all the way down to the bottom of the containor
shell to create width of inside the box
measured distance to determine size of the inside tray -1.55 twice from each width and length then offseted by 1 because it needed to be slightly larger
starfish offset, split and trim to combine shapes
Starfish Tray PieceI made the Starfish sketch cleaner
starfish offset, split and trim to combine shapes- the plan is to have two layers/ at two different heights so that the starfish stands out


Ornamentation for the side of the soap dish/container
I thought it would be cool to add ornamentation on the container along with the pattern, not as intricate but still figuring it out.
Seashell
Curve mirror arc tool, split in half and then used under surfaced 'curve network'- this combined the different lateral and vertical heights.
Then using arc tool to create shell shape, and straigt lines from the center to the edge of the arc. Selected the straightlines, projected onto shell shape- which made the lines follow the curve of the surface, sweeped 2 the edges
did this with this tutorial https://www.youtube.com/watch?v=8hvuUeDc5I0
I couldnt figure out how to do it to the shape I wanted
copied and pasted it. Duped the edges and connected it with a poly line used sweep 2, Joined it to make a closed polysurface. This video helped give me an idea of how to make a surface 3D: https://www.youtube.com/watch?v=KAre1dRvUbU&list=PLXeFqCRRSA3hGU688eWuYVTk5_RJdlFp3
Seaweed Ornament
https://www.youtube.com/watch?v=qv6Sui8SR78
used cage edit to edit sweep 2 result
Some support considerations: for the box there is a overhang where the tray would go currently I might just make extend downwards so its supported

Update: I still have to figure out printing and the lid part of the container. Right now the lid will slide and fit right on top of it.
The container will also be cut to have a opening for drainage, and so the user can easily grab the tray.
I want to continue to try to figure out organic shapes into it too, also round some edges so its not so harshly cut. but this alone took a bunch of time watching tutorials. I'm not sure how the 3d printer will like the ornamentation and all the angles stuff so thats something I still need to figure out!
Process continued... (note I was taking notes as I went but realized it didnt actually save so I forgot some things)
Traced shell and then I went I extruded the curve and revolved it
Made a mesh and then used cage edit to make it asymetrical
traced it and then used sweep 2 to make it cut inward
booleandifference it to cut into the shell
filletedges to make it less harsh of a cut and halfed it
Starfish
lofted star shapes
capped it and used cage edit to make it more organic looking
Seeweed
made a flat extruded polysurface and then used cage edit to found the middle part up and the sides down a bit
copied and paste it and warped it so the pieces arent identical
Water waves
drew the shape and extruded, boolean difference to cut out, then fillet edges, it left open parts when i did this. in the end I left the edges more hard cut, because there were edges that would not join and I wasnt sure how to work around that.
attempted making it softer edges using a sweep but then decided to fillet it
the shell had naked edges so I found it using show edges tool, I joined surfaces and then the bottom was the only part that was open. So I tried joining it but it didnt work, I ended up splitting it with a box (instead I initially did with a planar srf) which then made a clean cut and closed it?
thought that it was protruding too much for my box so I flattened it using cage edits
same with the bubbles
Soap Starfish Tray
I had issues where some had missing surfaces which i fixed using sweep tool
then since it wasnt closed polysurface I had to see why...
I joined them all together
I made is higher than the rest of the other details to make it stand out more.

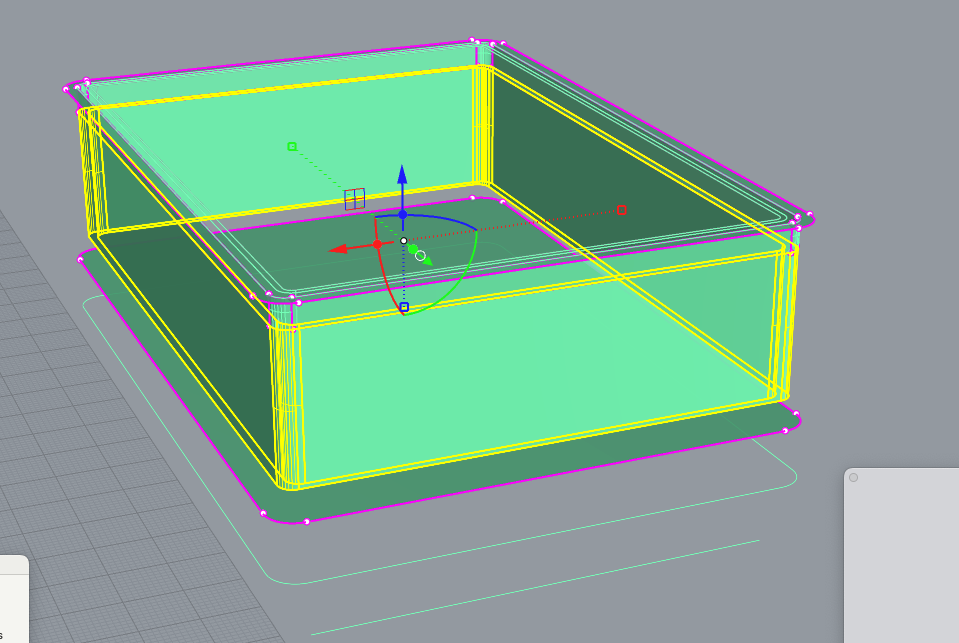
The container:
I had to figure out how to design the top and bottom of the box to fit together. Originally I wanted it to just fit top to bottom but I also wanted to make it so that the top of the box fits under the bottom as well so that when ppl have it open they have a spot to put the piece of the box. Originally the box was going to have equal halves, but I realized that to save space the half holding the tray should be shorter then the the half that needs space for the height of the soap bar, so I changed my design to fit that.
originally I was going to swap the bottom box to the top so I attempted to get rid of the overhang par that holds the tray, used sweep2 fill whole
duped edges to extrude outeredge and make the top of the container
then I shelled it but I also boolean differenced it to cut in the top with the bottom. which took a lot of extra work to make it match, it was probably unnecessary but I wanted to make sure they wouldnt get in the way of each other.
The tray turned out to be a closed non-manifold surface which I didnt notice until it was pointed out to me, so I googled how to fix it. I also made the tray thicker so it would be more sturdy.
Slicer I followed what the A-Z told me to do. The star fish tray took around 2 hours to print, the top of the tray took around 6 hours, and the bottom around 4 hours.
I met with the technician and he gave me advice to turn the polysurface into a mesh with as many polygons as possible before putting it into slicer. Then exported g codes and printed. Supports for the tray was minimal, in retrospect I could of made the circles of the starfish extend all the way down so It wouldn't had needed any.
my polysurface was open so i had to explode it all and connect it all
added a bottom edge to it
Had to rescale stuff to the top originally it was going to be on the bottom part, but because the top should be bigger to fit the soap I then had to adjust the scale, using scale and cage edit. Then made all the details of the box intersect and boolean union them together.
I had issues because my starfish was a open mesh or something so I googled to solve it made it into a solid and combined it
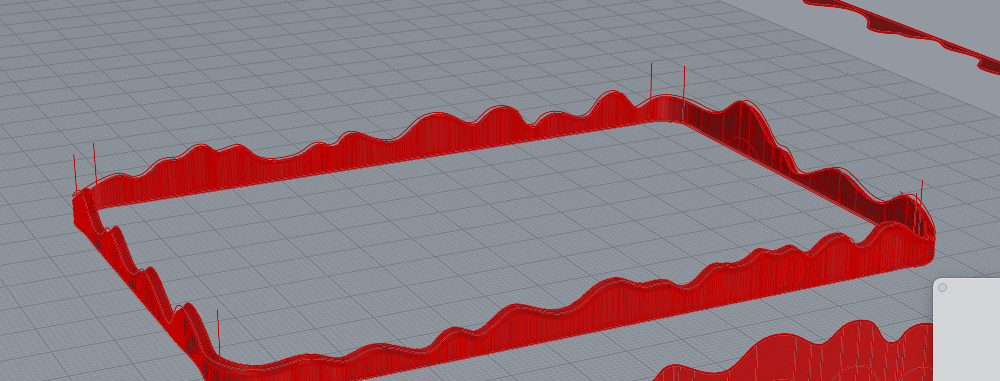
Then I wanted to add details to go fully around the bottom piece I unrolled my object and then designed the wave pattern on there. I thought I would be able to use flow to surface but that didnt work.

then I thought I would draw it directly onto the object which worked using the view ports front and right, extruded the curve.
offseted the surface and extruded again
then sweeped it to connect it together since cap wouldnt join them
then I trimed the surface so it was flat at the bottom
connected to make it a closed solid polysurface
then adding the lip I used boolean difference and then fillet edge to make it softer. This was so that people can take the tray off of it easily enought

Printing
Top of the box took a little over 6 hours bottom took 4ish hours and the tray took 2 hours to print. I printed two bottoms because I forgot the drainage lip. and Two trays cause when I was reprinting the bottom I thought I might as well because the printers were free.
this is it pretty much done but I realized I forgot to do the lip for the drainage so I decided to print again
I also decided to print the tray black to see how the contrast would feel.
Final Photos
photoshopped and edited background, taken with my phone
The soap did fit in it although dove soap bars are really thicker than standard I think. the box is able to store extra soap underneath and I had fun taking photos!
Renders
top of box: inspired by waves and a mix of texture that I started out with,
Technical Drawing
This took really long to do, I had issues with my computer when I applied make 2D it got stuck at 2% and buffered for so long. I decided then to head to school to do that part and then go back and edit the lines and stuff. Which then I got damaged file transferring it, but I saved copies so I had to go back to the school and worked on it until 12:30am, dimensions were tricky again I added units this time, I eventually found doing dimensions on the drawing viewport was best. I did the measurements by using distance since dimensions would not want to grab the spot I wanted, so I typed that in.
for some changes I made the outlines thicker at 1. I had to split some lines so it would run on the outline only because some lines overlapped.
For making it into a pdf I found rhino pdf set with vectors made the line weights accurate but I had issues some of the arrows would show up as lines on the second photo, not sure how to fix that changed layers so it was with the other arrowhead that did show up and still didnt fix it.


.png)


Comments
Post a Comment